6 Tips for Integrating Magnets into Your Makerspace

A makerspace is the perfect place for kids and adults to MAKE things! Makers can explore various materials, configure and construct solutions to various problems, use various tools and techniques, put the engineering design process to the test, and best of all … learn by doing.
National Week of Making (coming soon this month!) is the perfect time to set up (or plan for) a makerspace in your home, school, library, camp, or other learning space. Plus, summer is a wonderful time for making!
There are lots of online resources like this one to help guide you in your set up and materials selection, which should, of course, include magnets! Luckily, the magnet experts are here to help you incorporate magnets into your makerspace, with these six practical tips:
- Start smart
 Before your mini makers attempt to incorporate magnets into their makerspace creations, they need to understand how magnets work and what they can and cannot do.
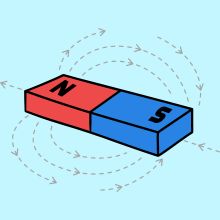
In an age-appropriate way, use your magnets to introduce and demonstrate the basics of magnetism, including polarity, attraction, repulsion, magnetic fields, and magnetic force and motion. Inquisitive makers may even ask who discovered the first magnet or how magnets are made.
Some makers may be ready to learn about other principles, such as gravity, shear, and friction, which can affect how magnets work. Older or more advanced learners may benefit from diving into deeper topics, including electromagnetism, with kits such as these.
- Provide many magnet materials
There are many different magnet materials, each with advantages and disadvantages for various applications for use. Review (and demonstrate as needed) each magnet material listed below.
Consider printing this handy Magnet Selection Guide – or the more in-depth details written further below – and posting them near your magnet storage bins. Keep in mind that there’s still a range of grades for each of these magnet materials (example: not all alnico is the same), but this is good guidance to follow for the sake of general comparison:
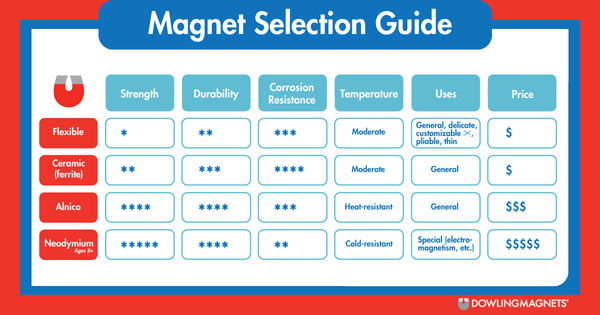
 These magnets are inexpensive, easy to cut and shape with scissors, and flexible (of course), but they’re not very strong! (Keep in mind that generally the bigger the surface area of all the flexible magnets you use, the stronger the hold.)
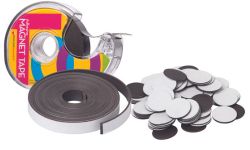
Flexible magnets come in tape rolls (for holding thin paper and delicate photos), dots (easy to apply and used mostly with paper and photos), and stronger strips (which can support paper and lightweight plastic or foam). Also, rectangular sheets and dry-erase name plates provide even more surface contact and can be used for many projects beyond their original purposes.
These magnets are also economical but typically have more holding power than flexible magnets. Ferrite magnets are called ceramic because, like the process of kilning ceramic pottery, ferrite magnets go through a sintering process after they are molded. And also like ceramic pottery, ceramic (ferrite) magnets are non-flexible and can chip or break if dropped. That’s simply a scientific property of the material.
 They can’t be cut or shaped, but ceramic magnets do come in a wide range of shapes and sizes, including bars, blocks (unlike bars, blocks have poles on their sides rather than their ends), wands (think block magnets but with a handle), rings (also sometimes called “donut magnets”), horseshoes, discs or buttons, marbles, latches (used in the assembly of our magnetic hooks), and more.
Ceramic (ferrite) magnets don’t generally come with adhesive, but you can apply glue (rubber cement works well on raw and painted ceramic), if you wish to make them stick to non-magnetic surfaces.
 Although they can still break, alnico magnets are durable. They’re also stronger than flexible magnets and most ceramic ferrite, so they cost a bit more. The most common horseshoe and bar magnets used in science classrooms typically are made of alnico (and sometimes ceramic), and cylinder-shaped cow magnets are alnico, too.
Fun fact: alnico gets its name from a combination of the names of its “ingredients” (ALuminum + NIckel + CObalt … and some iron).
 Neodymium is super strong and should be used with caution and respect. While pricier than other options, neodymium magnets do have their place in STEM projects and makerspaces for older makers.
Useful when exploring electromagnetism or building motors or electronics, these magnets are not appropriate for students under age 8 (and even older children and adults should be taught about magnet safety before using them).
- Stay safe
All makerspaces should follow the safety-first philosophy, and staff should make sure that all makers review the rules of safety prior to each session.
For example, check your magnet packaging for small magnet hazard warnings and equip your space with a small parts cylinder to test the sizes of your magnets. Remember: children under the ages of 8 should not have access to any small powerful magnets made of any type of magnet material. (If a magnet fits all the way into a small parts cylinder, that magnet is too small for young children to access.)
Also be aware of the potential for strong magnets to pinch hands and fingers—makers should handle these magnets slowly and carefully.
Lastly, strong magnets (especially neodymium) can be sneaky. They may attach themselves to magnetic backpack zippers, pocket rivets, shoelace eyelets, and jewelry. This means they can unintentionally make their way home (or into other rooms near your makerspace), where young children may be present, so we recommend that you have your makers pat themselves down before departing!
- Offer shape and style variety
Options, options, options – makers need a variety of magnets to try and test! Be sure you offer a wide range of magnet sizes and shapes, including bars, horseshoes, wands, blocks, discs/buttons, dots, tape, strips, sheets, rings, latches, marbles, rods, cylinders, and plugs (on wires even!) … so you’ve got just what your students need to bring their creations to life.
Consider various formats and styles of magnets, including plastic-encased, polished, painted, and magnets with marked poles (north and south).
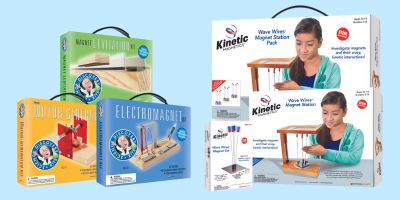
Feeling just a little overwhelmed with all these options? We get it! We’ve put together three age-appropriate Classroom Attractions Kits, each loaded with a wide variety of magnets in various materials, shapes, and formats (with multiples of each magnet!) to make it easier for you to start outfitting your makerspace.
- Don’t forget important accessories
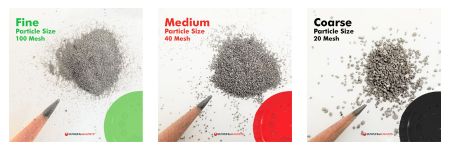
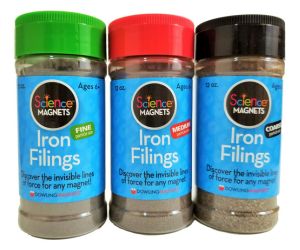 Providing makers with key accessories, such as iron filings, for use with magnets is key! Be sure to make available iron filings in a variety of grain sizes, including coarse, medium, and fine. This enables exploration and supports makers in optimizing their designs.
Makers can compare and contrast performance, patterns, and designs made by different magnets and grain sizes of filings – a great STEAM activity!
 Must have: iron filings that come in a turn-top shaker jar specifically will greatly reduce waste and mess in your makerspace.
Makers who are not quite ready to investigate and create with iron filings (but are at least ages 3+) can enjoy using metal-rimmed magnetic chips along with magnets.
- Consider storage
Store your magnets away from high heat, extreme cold, and direct sunlight. Some magnets, such as neodymium and strong alnico magnets, need to be stored away from electronics and other magnets. This protects their magnetism and keeps them from demagnetizing or remagnetizing other magnets.
 Magnets made of other materials may be stored together – but remember, they’ll stick together, so some makers may need support pulling them apart.
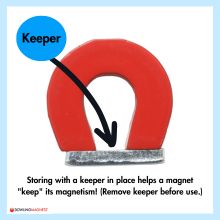
If magnets – generally alnico horseshoes – come with keepers (small steel bars or plates), don’t throw away those keepers! Store these magnets with their keepers in place (on their poles). This helps the products “keep” their magnetism, which makes the magnets last longer.
Flexible magnets should be stored flat, preferably attached to another magnetic-receptive surface, to prevent curling. You can stick them to a slim magnetic-receptive board, a steel plate, or even steel (not aluminum) cookie sheets for this purpose.
Follow these six simple tips when selecting and incorporating magnets into your makerspace, and your makers will dazzle you with their innovative magnetic designs!
Tags: diy with magnets , engineering design , how to use magnets in maker spaces , how to use magnets in makerspaces , magnet diy , magnets in maker spaces , magnets in makerspaces , maker space magnets , makerspace , makerspace magnets , makerspaces , science and engineering magnets , science fair magnets , science magnets
Share This: